Get in touch with Yibo Company


Self-Levelling Screed Underlay for Ship Decks: From Preparation to Floor Handover

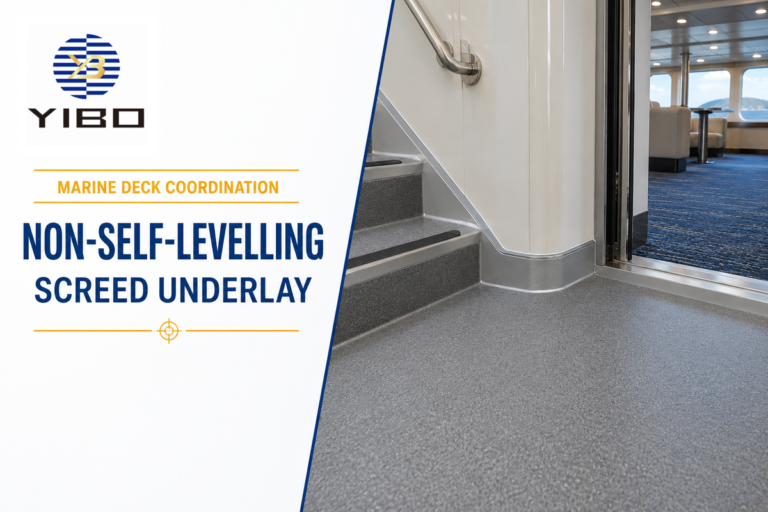
Self-Levelling Screed Underlay is the preparatory layer to be covered by the floor wearing surface. The challenge for the yard and for the installer is to determine exactly when that surface has been prepared sufficiently so that the next trade can continue, considering the surface and drainage profile, the deck details and the associated evidence.
Use these seven checks as a project coordination guide. The suggested records supplement the approved installation procedure; they do not set product mixing ratios, cure times or vessel approval requirements.
A layer can appear ready without establishing whether a primer document has been filed or an issue with a drainage detail has been finalized. Establish the selected build-up with controlled instructions, then carry sufficient evidence to a defined release point.
Where self-levelling screed underlay fits in a ship floor
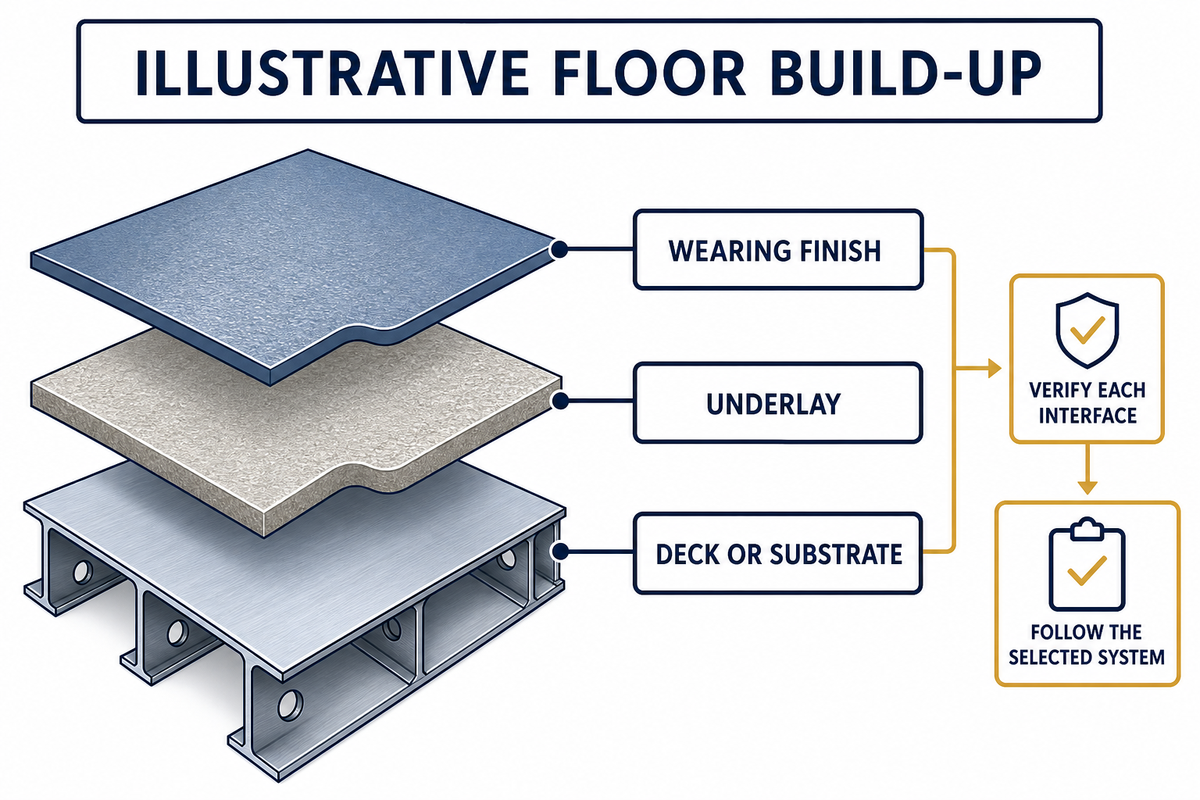
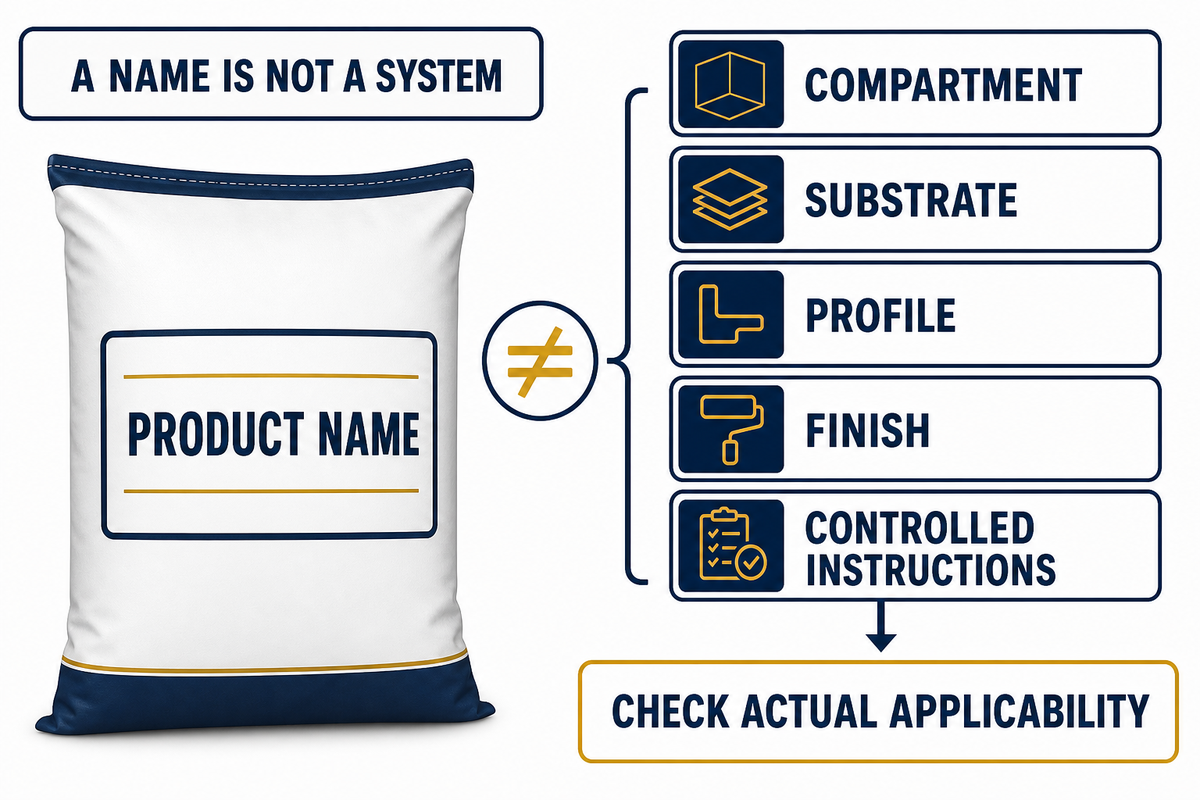
Marine underlay is part of the deck’s build-up; the finished wearing surface is a separate design component. First determine which drawing layer has been defined as the underlay, what supports it, and what it will carry in turn. These interfaces are more important than whether a bag or search result calls the material screed, compound, or leveler.
Scope check: The public catalogue for ISO 5694:2023 covers cement-type underlays and excludes the floor coverings laid over them, such as tile, carpet and rubber. That catalogue scope does not establish a particular product’s suitability or approval.
The US Coast Guard’s finishes guidance reproduces the FTP Code definition of primary deck covering as the initial flooring upon deck plating consisting of any primary coat, anticorrosive compound or adhesive needed for preservation or binding. Using the definition, clarify the drawing, ensure the applicable project approval requirements are checked, and confirm the result.
- Deck or existing substrate: The deck or substrate; what material; which existing primer or coating should remain in place?
- Underlay and interface layers: use the names and revisions shown in the selected system.
- Finish flooring: Define the wearing finish, applicable interlayer and adhesive in concert.
Use Yibo self-levelling screed underlay information for product data and store it next to the project data. Keep primary deck covering and underlay as separate project categories; the names alone don’t make the systems interchangeable.
Check 1: Confirm the underlayment and finish system
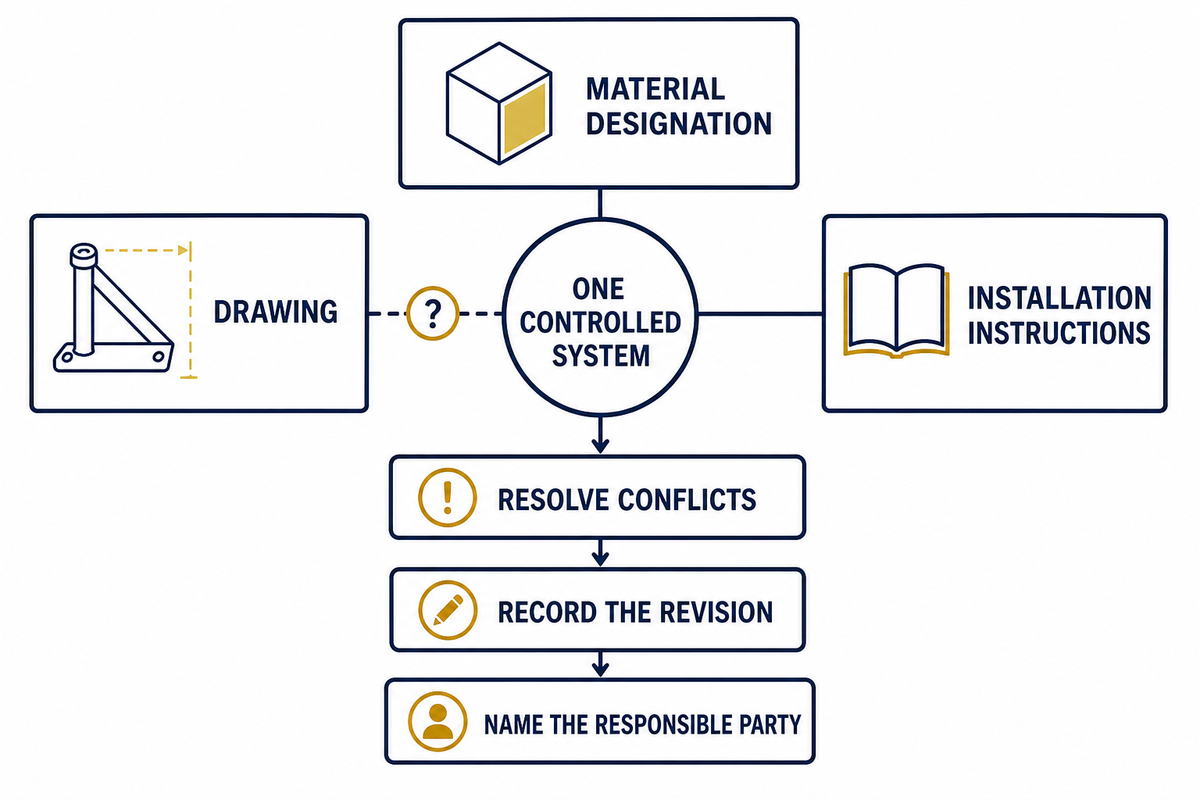
The work pack issued to the site, with an index both the screed crew and installer can use, should identify the chosen underlayment for installation. Agree in advance what documentation shall be used for the next floor installation. Record the revision status of the nominated documentation against the task, drawing and supplier information, and identify the person responsible for interface issues. It’s far better that the applicable revision of the supplier documentation be verified against a project requirement than for an unauthorized change to be made.
A useful document-control example: NAVSEA Standard Item 009-026 FY28 CH1, dated 31 March 2026, requires a current NAVSEA-reviewed ASTM F718, or the manufacturer’s technical data sheet where none exists, to be maintained for the supervisor. Clause 3.2.2 sets document precedence within that Navy work scope; neither provision grants a general approval for commercial ship installations.
Keep the issued work pack index simple for use by the screed crew and installer together; list interface questions and mark which the teams have resolved and which remain open.
- The specific designation of the materials, intended compartment, and vessel or flag conditions as identified by the project authority.
- The selected deck substrate, preparation method, and primer decision, including any approved deviation or concession.
- The limits of the underlay thickness, including the applicable finishing materials or adhesive.
- Applicable installation instructions, safety data sheets and inspection requirements.
- The authority to approve deviations or concessions and to authorize subsequent operations.
Illustration – interface challenge example. Illustrative coordination problem: The cabin drawing specifies one flooring type; the order form specifies another. Agree what’s required, record the discrepancy and complete the interface review before re-issuing either. A change to the cabin floor covering can leave questions that the underlay data sheet can’t address by itself once the finish has been installed.
Check 2: Set the target plane, thickness and drainage
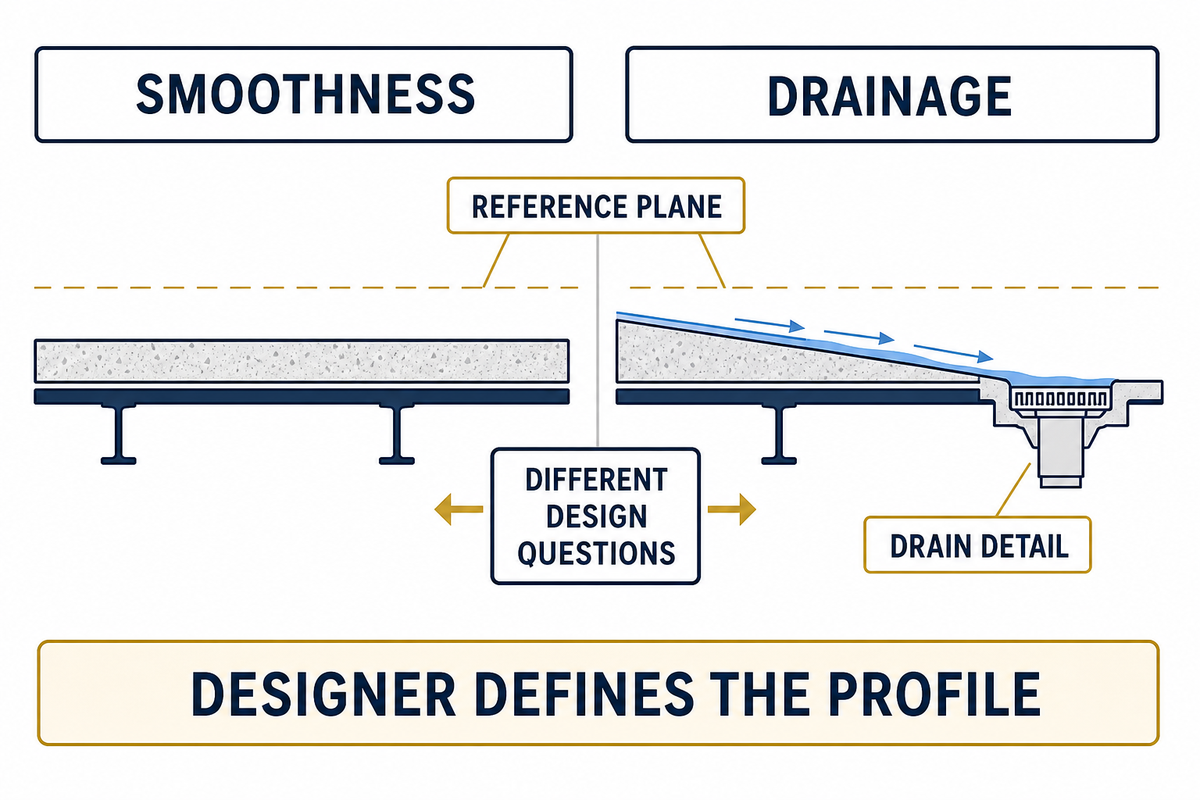
The floor design profile shall be established and agreed before application. A smooth surface and a surface that will provide drainage answer different design questions. The designer should identify the reference plane, relevant vessel condition and deck drainage as the basis for the crew’s measurements.
“Water must flow to drains and not stand or puddle.”
Using a typical application thickness provided by a generic manufacturer data sheet as referenced can’t determine the allowed build-up where seams, depressions, thresholds, deck-drain edges or deck penetrations occur; please request profile data from your project contact for the areas in question.
| Location | Question for the responsible designer | Record to retain |
|---|---|---|
| Dry compartment | Which surface tolerance and datum apply? | Drawing reference and agreed measurement method |
| Wet area | Which areas drain, and under what assessment condition? | Fall arrangement and drain acceptance requirement |
| High seam or threshold | Can the selected build-up fit the available height? | Measured feature and authorized detail |
| Deep local depression | Does the proposed fill remain within the system limits? | Depth survey and any required design disposition |
Send any proposed deviation from the specified build-up thickness to the design owner, together with an assessment of its weight impact. Request details of how the non-standard profile will be achieved, and note that guidance on non-self-levelling screed underlay does not authorize an on-site substitution for the specified underlay.
Check 3: Release the surface for primer and screed
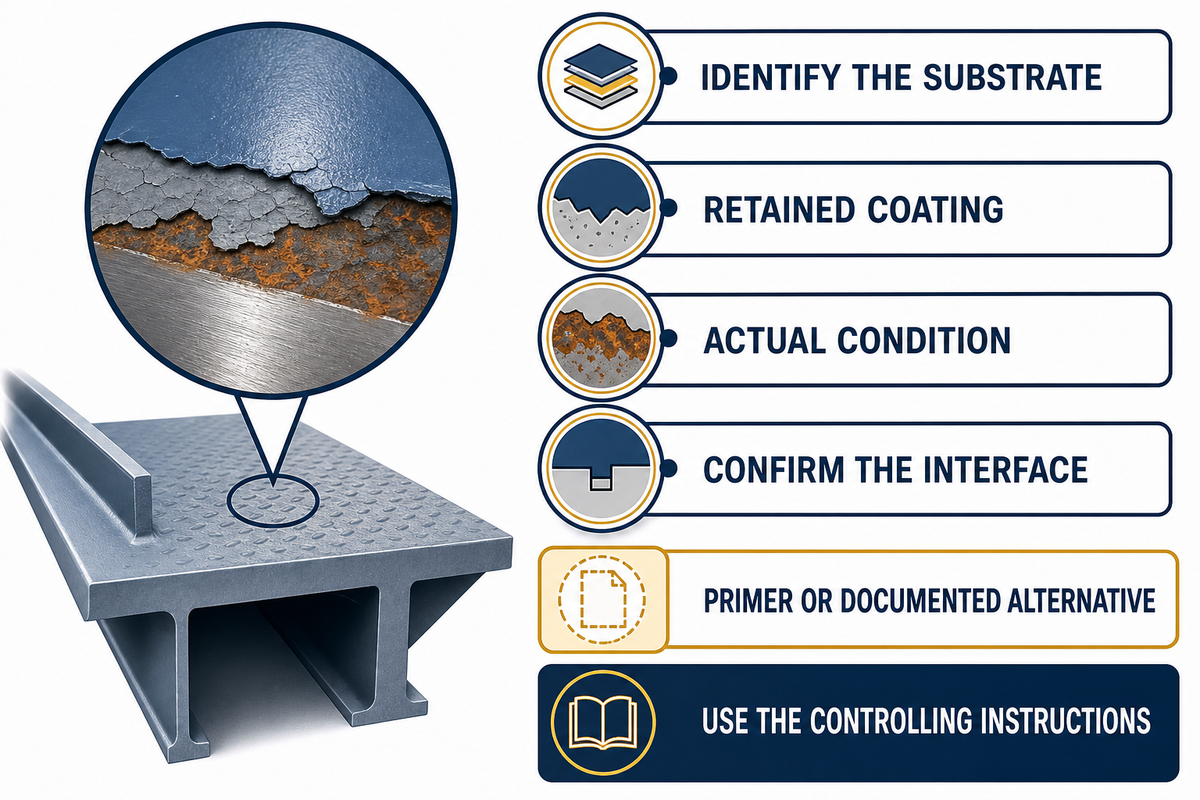
Surface preparation starts with the actual deck condition and the requirements outlined in the selected system instructions. Identify the type of metal, retained coating, and clearly visible damage before applying another layer. The release record indicates that an inspection has been conducted and a particular criterion has been satisfied; a visibly clean surface is not the only evidence provided to the following crew.
- Identify: document the substrate and the amount of any coating or existing underlay left in place.
- Inspect: point out corrosion, cracking, damaged details and contamination for the indicated assessment.
- Document preparation: record preparation against the instructions for application, including test or inspection results where necessary.
- Confirm the interface: The primer or documented no-primer solution to be used, including the conditions under which it applies.
NAVSEA’s cited item distinguishes underlay systems with different primer arrangements in clauses 3.7.3–3.7.4, including specified types installed without primer; consult the controlling system documents for the job in front of you.
Common assumption to remove: instructions for a basement slab or an interior floor leveling and smoothing application on interior concrete or cementitious substrates do not, by themselves, document compatibility with a coated metal deck. Keep the primer decision tied to the identified substrate and system, even when a building product is familiar to the crew.
If the prepared deck area still has an unidentified coating on a relatively small spot, record that area and obtain a disposition before it’s covered; a photograph may help locate the area, but does not replace testing or inspection required by the work pack.
Check 4: Control the mix and record each pour
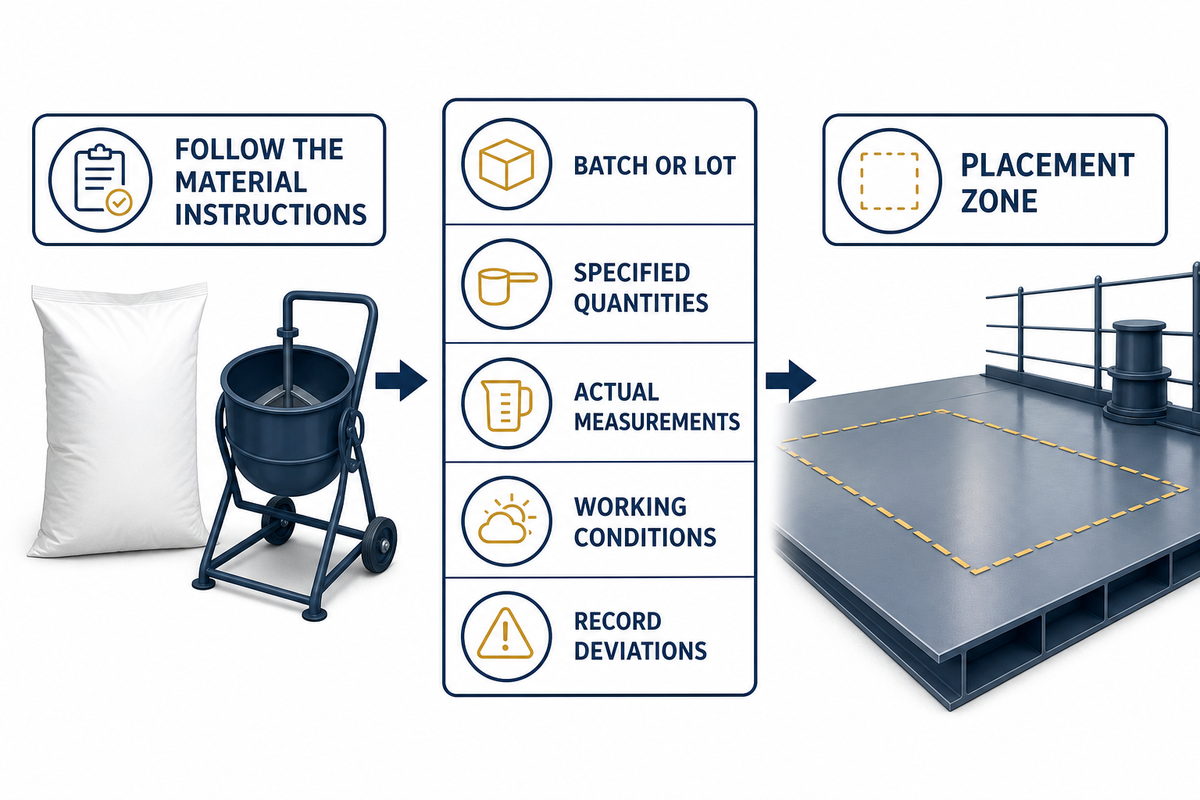
Follow the manufacturer’s mixing instructions and the relevant work pack for the chosen material and then develop an approach the crew can adopt to provide evidence that the instructions have been followed. Good handover records often identify batch, location, and any actual observation during mixing and application. The text below presents an editorial approach; actual required fields and recording intervals will be specified by the project procedures.
Within its Coast Guard vessel work scope, SFLC Standard Specification 6341 (2022), clause 3.1, directs compliance with manufacturer instructions for suitable conditions, handling, mixing and application. It does not establish a universal water ratio or a separate log for every pour.
Establish your recording strategy before you begin. For a cement-based product requiring water, this allows identification of the material, the specified quantity, the permitted water addition and the measured quantity. For another product chemistry, derive these record fields from product instruction details.
- Placement zone, material designation and batch or lot number.
- Instruction revision, required component quantities and actual measurements.
- Mixing, application times, and the working conditions stipulated by the procedures.
- Record any interruption or deviation and identify the person who determined its disposition.
What tools are needed for self-leveling underlayment?
Prior to ordering equipment, take into account the procedure, whether this will be pumped or applied manually, the specific mixer, and any drill/paddle, trowel or roller required; remember tools cited aren’t a method. Tool names such as “drill and paddle” do not by themselves define an application method for the specified build-up.
Before work: the site safety lead should review the safety data sheets and the actual mixing, preparation and coating tasks, including dust and ventilation controls where applicable. OSHA 29 CFR 1915.35 distinguishes particular solvent-containing painting operations; those provisions should not be treated as instructions for every cement or epoxy product.
For a wider application area, agree before work starts what defines an interrupted work section, how it’s identified and treated. If you overrun your prescribed ‘working window,’ don’t make assumptions; water addition or an additive to control foam is a mix change that must follow the required instructions.
Check 5: Separate foot traffic from final floor release
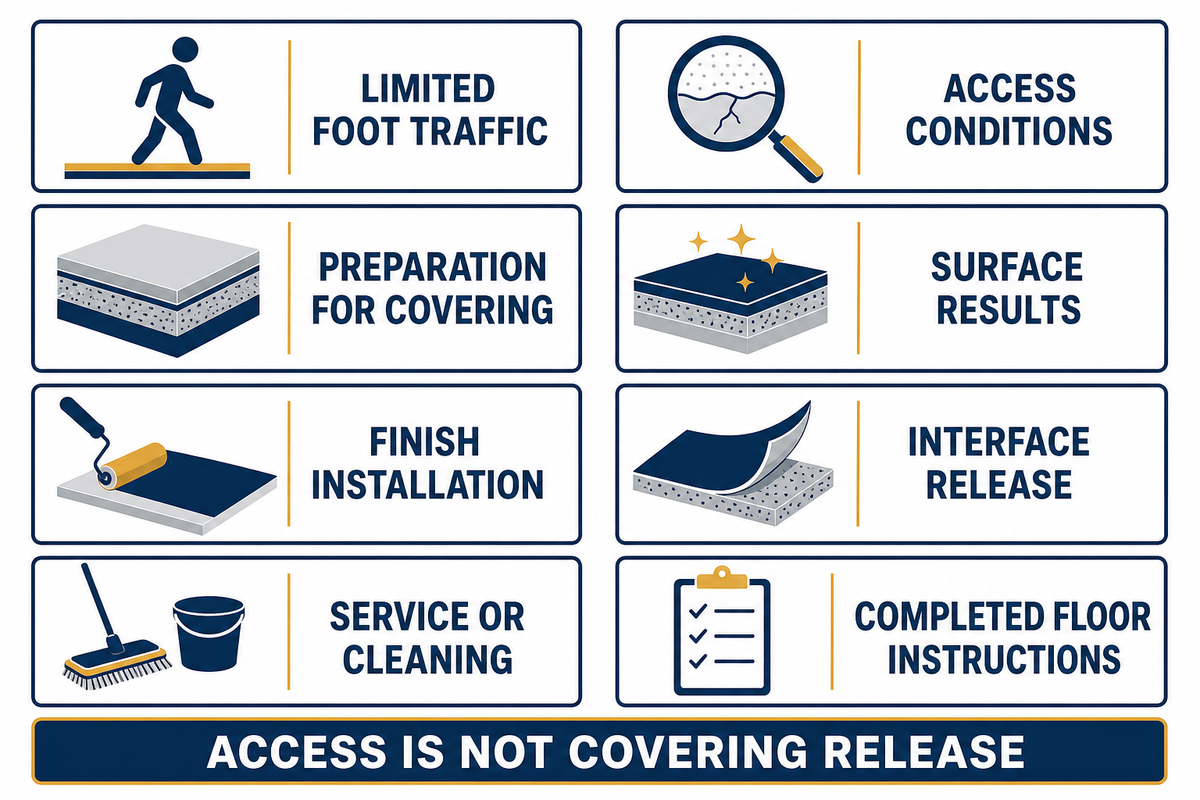
A decision permitting foot traffic over the underlay answers one limited access question. The release for the final floor finish will demand additional evidence involving the product, supplier, over-layer and adhesive requirements; confirm that the applicable deck-laying contract defines the interface and extent of works to be accepted, and specifies a responsible party.
| Proposed operation | Question to close | Evidence to identify |
|---|---|---|
| Limited foot traffic | Is access allowed under the specified conditions? | Applicable instruction and observed conditions |
| Preparation for covering | Are the required surface checks complete? | Specified inspection and any required test results |
| Adhesive or finish installation | Does the next system accept the prepared underlay? | Interface requirements and responsible release |
| Service or cleaning | Has the completed system reached its own release stage? | Completed floor instructions and acceptance record |
The referenced Coast Guard specification calls for access restrictions during curing and protection of completed coverings in clause 3.3. The NAVSEA cited item has several specific conditions relating to access, washing, and system examination, but these are not a universal covering time for the chosen underlay.
How long does self-leveling underlayment take to dry?
The drying assessment should reflect conditions stipulated for the specifically chosen product and its next layer; where “rapid-setting”, “ready for foot traffic” or “dry” feature in its documentation, confirm what each phrase represents according to that same document. Don’t assume.
Illustrative schedule decision: the cabin crew can enter, but the finish contractor has not received a required substrate result. Record access as permitted within its stated scope and finish installation as awaiting evidence; a single “floor ready” box would hide the difference.
For systems requiring a final layer, whether vinyl, carpet, or timber flooring, specify what will be applied, including the final flooring adhesive. Store any self-levelling deck covering product information for other flooring elements distinctly from the underlay manufacturer’s details.
Check 6: Resolve cracks, soft spots and wet areas
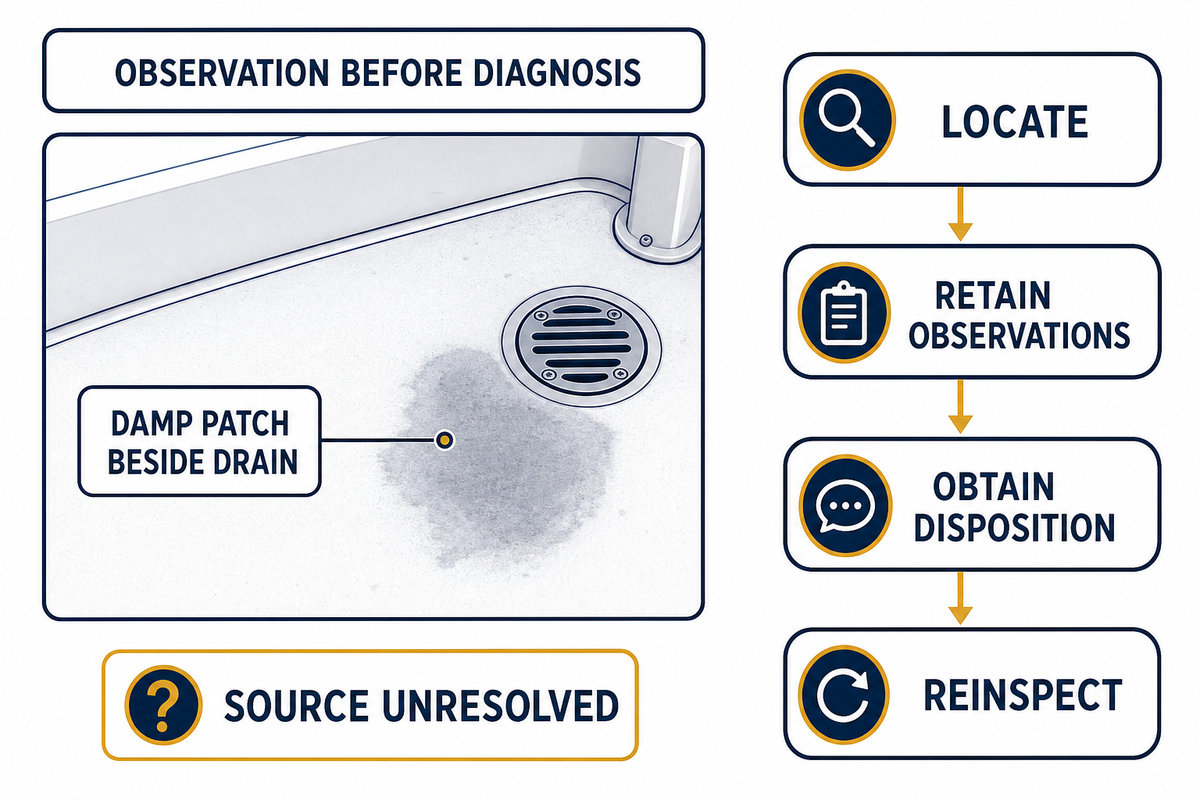
Before classifying, detail any actual defects to the underlay as they occurred. Record the specified location, descriptive detail, dated observations or photographs, along with the relevant construction history. Appearances and circumstances alone shouldn’t suffice in determining cause. Keep the defect explicitly open in the handover record until the responsible person or team completes the required disposition.
- Add the defective area to a marked drawing and retain dated observations or images.
- Include any other available records, such as ‘preparation’, material, or application data.
- Detail the necessary work pack inspection and identify who’s responsible for it.
- State what remedy has been accepted, and when the completed remedy will be reinspected.
The NAVSEA cited provision has a specific subclause covering defect correction after inspection of the installed, cured system and before acceptance of works; this may serve as a useful scoped guide. It shouldn’t be assumed that an alternative approach for an entirely different type of work constitutes an acceptable method.
A practical record: “Damp patch beside drain, first observed after cleaning; source unresolved” is more useful than “bad screed.” The first statement preserves an observation for investigation; the second assumes a cause and can send the repair discussion in the wrong direction.
An “accepted” or “complete for subsequent operation” date must not mask an outstanding issue. Whether sanding, removal or replacement is the proposed option, confirm with your project team how to proceed and the impact on the residual system.
Check 7: Close the Deck-to-Finish Handover Record
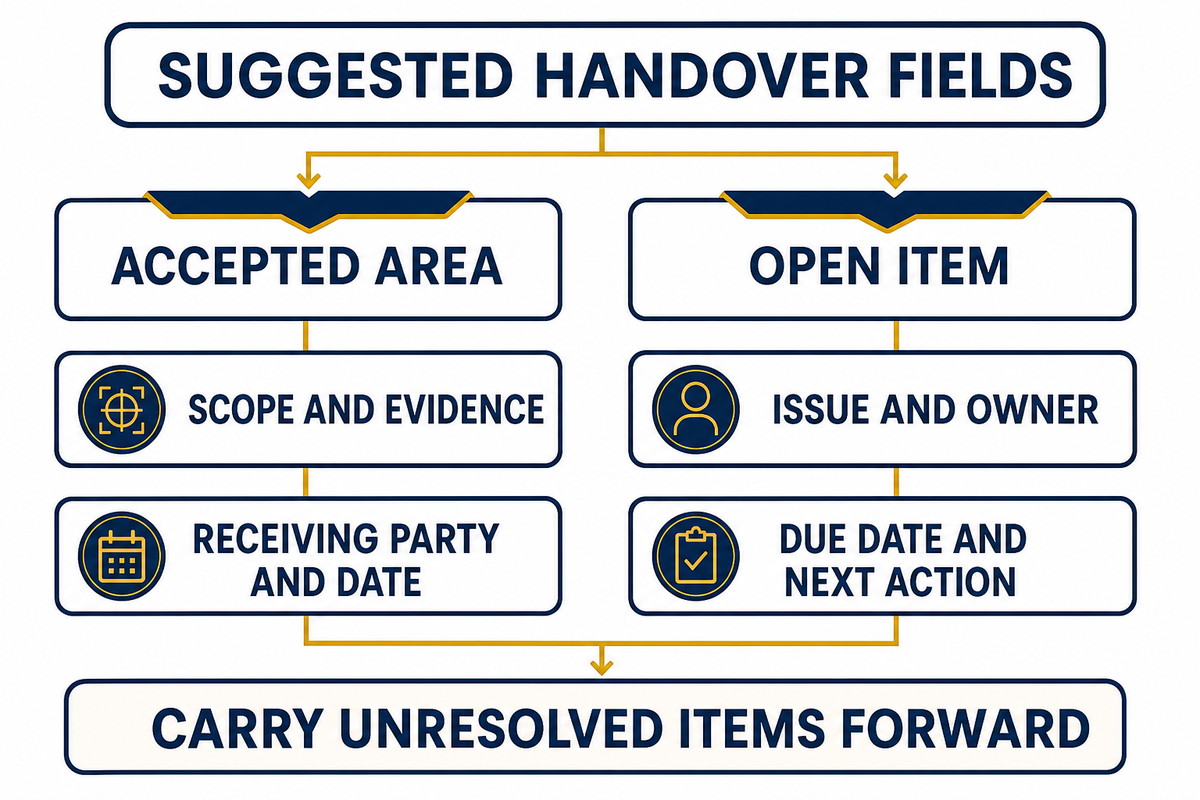
The following provides an overview of the essential points for the ‘Deck-to-Finish Handover Record’; this isn’t a formal standard document but an editorial template to help illustrate these points. This template may be customized to the project contract requirements and remains a work in progress until open items are resolved. All unresolved items must be carried forward for the responsible party to close out, with visibility to the next trade.
| Entry | Requirement or evidence | Decision to record |
|---|---|---|
| Zone and system | Compartment, drawing and material identities | Scope of this handover |
| Document set | Controlled work-pack and instruction revisions | Conflicts resolved or still open |
| Deck condition | Preparation inspection and retained substrate details | Accepted extent and exceptions |
| Profile | Datum, thickness survey and specified drainage checks | Design departures and disposition |
| Primer interface | Required primer record or documented alternative | Interface accepted or evidence pending |
| Placement | Material lots and required mixing or pour records | Deviations and their closure |
| Access | Specified foot-traffic conditions and evidence | Permitted activity and limitations |
| Covering interface | Required surface results and next-layer instructions | Release for the named covering operation |
| Defects | Issue locations, disposition and reinspection | Closed items and remaining exclusions |
| Next trade | Handover recipient and supporting attachments | Accepted area, date and outstanding actions |
| Closing fields | Open-item number, owner and due date | Handing-over party/date and receiving party/date |
Illustrative example only; this is not a Yibo project handover record. In cabin ‘A’ the controlled work pack calls for primer; however, the application record is still not presented. The entry names the issue, lists the responsible party and indicates that final work awaits the required records and acceptance.
Avoid defaulting every row to “pass.” An open item needs an owner and a next action, while an accepted row needs enough detail for the receiving contractor to understand what was accepted.
For a Yibo inquiry, consider attaching the specific compartment/deck description, intended build-up, target finish, exact material designation and pertinent project documents. Direct such discussions via the self-levelling screed underlay product page and request the project-specific technical information needed to assess the proposed build-up.
Self-levelling screed underlay FAQs
What is self-leveling underlay?
Self-leveling underlay is typically a layer underneath the floor finish. Check the applicable deck specification and floor build-up. ISO 5694:2023 distinguishes cement-type underlays from overlaid coverings; its public scope does not establish a material’s waterproofing, substrate suitability or compartment approval.
Is screeding the same as self-leveling?
A self-leveling material flows during placement, while screeding must achieve the required surface profile; similar product terminology, such as self leveling underlayment, doesn’t establish interchangeability. Confirm the intended outcome, including the smooth floor, level surface, profile and drainage, against the named product specification, placement method and controlled installation instructions for the compartment and deck condition in the work pack.
What do you put down before self-leveling compound?
Across large areas or a small area, follow the specified system’s preparation requirements for wood flooring or another finish; prime only where those instructions require it. That can mean a primer; however, the requirement comes from the actual installation documentation. Start by comparing the current application and substrate. The existing coating alone does not establish compatibility, and a concrete-floor primer recommendation for a different underlayment does not make a system compatible with this ship’s deck.
What is the best self-leveling underlayment?
The initial check starts with proven applicability to the compartment, substrate, profile, and finished floor. Compare the exact product instructions with the actual installation conditions, including thickness, preparation, mixing, and release requirements. For a Yibo product, specify exactly what variant is being considered. Find the current documents for this variant, proposed finish, and adhesive.
- A bag of self leveler or a “one-component” description identifies neither the complete installation method nor the receiving subfloor requirements.
- Ask which drawing and procedure support the proposed thin layer at the highest point.
- For flooring projects with several trades, name the person who will resolve missing interface information.
A durable, long-lasting floor is the desired outcome. Neither term offers a real acceptance guideline. Consider the documented constraints and unanswered questions before evaluating whether a familiar product may offer an acceptable substitute.
Can foot-traffic readiness release the final floor finish?
Foot-traffic readiness does not release the final covering installation or confirm suitability for the next layer. Verify the specified underlay, adhesive and finishing conditions against the applicable project documents, and retain required documented authorization for that named floor covering operation.
References & Sources
- ISO 5694:2023 public catalogue: cement-type underlay scope; the full paid standard was not used.
- US Coast Guard, Interior Finishes and Furnishings: primary deck covering terminology.
- NAVSEA Standard Item 009-026 FY28 CH1, 31 March 2026: clauses 3.2, 3.7.3–3.7.4 and 3.9.14–3.9.15, within its Navy work scope.
- USCG SFLC Standard Specification 6341 (2022): clauses 3.1 and 3.3, within its Coast Guard vessel work scope.
- OSHA, 29 CFR 1915.35: requirements for specified shipyard painting operations.
Written by Aurora. This guide presents public-source information and suggested project records; it contains no first-hand Yibo installation test results or independently verified Yibo project case.
Commercial marine flooring systems
Plan the deck build-up before the workfront is released.
Yibo manufactures commercial marine flooring systems in Suzhou for vessel projects that need a coordinated deck-covering, resin-floor, or acoustic-floating-floor build-up.
Review marine deck covering systems, marine resin floor systems, and marine acoustic floor systems against the vessel area and planned application sequence.
Project enquiry
Give the engineering team the inputs that shape the system review.
Include the vessel area, substrate or deck condition, intended floor build-up, fire or acoustic target, and project schedule so the enquiry can begin with the relevant deck constraints.
Send Your Deck Schedule


![Marine PU Floor: Selection & Installation [Guide]](https://yibomarine.com/wp-content/uploads/2026/09/marine-pu-floor-blog-featured-150x150.png)